Reprap Homing Doesnt Bump Check Again
Teacup Firmware is a RepRap firmware with emphasis on operation, stability, code cleanliness and simple usage. It was RepRap's showtime firmware to feature acceleration, the first existence ported to an ARM-based controller and continues to be first-class at what it does. Teacup is known to run on RAMPS, Generation 7 Electronics, SinapTec, the Teensy2, Teensy3, Generation 6 Electronics, Sanguinololu, Generation three Electronics, NanoHeart and for all other RepRap controllers it should be a thing of adjusting the pin mapping to get it running.
| Perfection (in design) is achieved not when there is nil more to add, just rather when there is nothing more to have abroad. |
| Antoine de Saint-Exupéry |
Teacup is fast and runs steppers smoothly. Information technology avoids C++ in favour of evidently C, uses 100% integer math and works very hard to minimize/eliminate long math operations in interrupt context. Equally a issue, it offers optimum precision over a wider range (integer = 31 scrap, float = 23 chip), information technology's only half the binary size of similarly featured firmwares, runs on nearly whatsoever ATmega and several ARM microcontrollers, and can still be tailored to run on controllers as small as the ATmega168.
- Git Repository with source code
Recent Discussion
Contents
- 1 Recent Discussion
- ii Features
- 3 Installation
- 3.one Prerequisites
- iii.ii Simple Installation
- 3.iii Configuration and calibration in general
- 3.4 Configtool troubleshooting
- 3.5 Installation using Arduino IDE
- 3.six Developer Installation
- 3.6.ane Getting a re-create of the Repository
- 3.6.2 Edifice using the Makefile
- 3.6.3 Changing to another branch
- 3.6.four Updating the repository
- iii.6.v Keeping local changes
- 3.vii Tuning for small-scale binaries
- 4 Using the firmware after install
- 5 Design Details and Tuning
- 5.1 Communications to the Host
- 5.1.i Baud Charge per unit
- 5.1.ii XON/XOFF Flow Command
- 5.ane.3 Direct USB
- 5.2 SD card support
- 5.two.1 SD card Troubleshooting
- 5.3 Pin configuration
- five.4 Heater & Fan Setup
- 5.5 Kinematics
- 5.vi Distances and Velocities
- 5.6.ane Distances as expressed in steps
- v.6.2 Velocities in mm/minute
- 5.7 Adaptive homing feedrates
- 5.eight Constant Acceleration
- 5.8.1 Acceleration, RepRap Manner
- five.8.2 Dispatch, Offset/End Ramping
- 5.9 Endstop Handling
- 5.ten Lookahead tuning
- 5.xi Canned G-code
- 5.1 Communications to the Host
- vi Programmer Department
- six.1 Design Goals
- 6.2 Patches
- 6.3 Enhancements
- six.four Running Teacup in a simulator
- 6.4.1 Teacup on i386 hosts
- 6.4.2 Teacup in SimulAVR
- six.4.3 Doing precision profiling
- half dozen.5 Toolchain for ARM
- six.6 Porting to other (ARM- or non-ARM-)platforms
- 6.6.one Tools
- 6.6.ii Initial steps
- 6.six.3 Porting steps
- 6.6.four Final porting steps
- 7 Rationale and History
- eight Architectural Overview
- ix Interesting code sections
- 10 File descriptions
Features
- All the usual stuff, like iv axes, extruder, jerk-based look-ahead, thermistors.
- It's said information technology runs stepper smoother than average firmwares. It'south certain Teacup developers take bang-up care of code quality.
- Decent performance: can run upwards to 48'000 evenly spaced steps/2nd on 20 MHz ATmegas, much more than on ARMs.
- Capricious number of heaters.
- Arbitrary number of temperature sensors.
- Support for the MAX6675 temperature sensor.
- Teacup Configtool for GUI based calibration and uploading.
- Tool to calibrate thermistors for authentic readings.
- Independent from Arduino IDE, runs on AVR ATmega as well equally Arms and even a normal PC.
- Many topic branches with developments like support for wire cutters, support for 9 axes, support for even smoother stepping, etc, etc..
Installation
Teacup Firmware comes with Teacup Configtool, a dainty GUI which makes configuration, calibration, edifice and uploading very piece of cake. Information technology too compiles with Arduino IDE and/or using a Makefile.
Prerequisites
You lot need the aforementioned equally when running Pronterface:
- Python two.7.x or later, but non Python iii.ten.
- Matching wxPython.
- avr-gcc and avrdude OR Arduino IDE (installed or just unpacked).
Chances are good you have this installed already. On Debian/Ubuntu, run this on the command line to confirm/install:
sudo apt-become --no-install-recommends install gcc-avr avr-libc avrdude python-wxgtk3.0
Recent versions of Mac OS 10 take a sufficiently recent version of Python as part of the standard distribution.
For others, consult the download pages of Python, wxPython and Arduino.
Elementary Installation
- Get the Teacup Firmware master co-operative parcel and unpack information technology. If yous know what "Git" ways, adopt that, meet #Programmer Installation below.
- Open up the just unpackaged directory and double-click configtool.py to start it.
- Choose Menu -> File -> Load printer and select the one closest to the printer yous want to operate.
- Cull Menu -> File -> Load board and again select the one closest to (or matching) your actual hardware.
- Choose Menu -> File -> Relieve config.h.
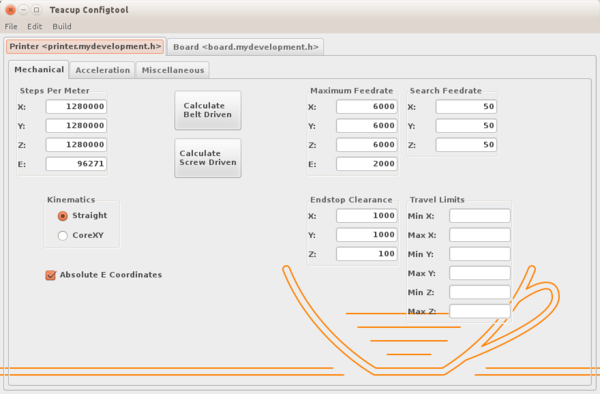
At present Teacups basic setup is done already, you should see something like this:
At this indicate y'all accept to aid Configtool to find the compiler and the USB/series port your controller is connected to. This has to exist done only once.
- Cull Menu -> Edit -> Settings. A dialog similar this should come up up:
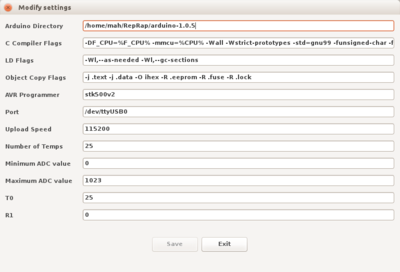
Here you likely accept to adjust a few things. In instance you're unsure, but try.
-
- Arduino Directory
- Enter here the full path to where you unpackaged Arduino IDE. Teacup Configtool will figure the details on where to find the neccessary tools (avr-gcc, avrdude) inside this packet.
- If you don't want to use Arduino's tools, you can leave this field empty. In this example it's up to the operating arrangement to find the tools, which volition work fine if you installed them with the parcel mananger or made them bachelor in your $PATH surround variable.
-
- Port
- This is the full path of the series port your controller is continued to.
These checked, hit Save in the settings dialog (or Exit, if there was no change). You lot're at present set to build and upload:
- For edifice, choose Menu -> Build -> Build.
- For uploading, choose Carte du jour -> Build -> Upload.
After each modify to the firmware configuration you have to repeat merely these last two steps.
Configuration and calibration in general
With the first upload done, you can start testing and using Configtool for adjusting and calibrating the printer. Just alter the values, build, upload. Much easier than wrestling with obscure M-codes and also makes sure your controller is e'er working at maximum operation.
- Nearly all the fields take large and explaining tooltips. But hover with the mouse over the fields to get hints.
- Teacup developers also took great care of giving meaningful error messages. Read them, please :-)
- Teacups default configuration is very bourgeois, to avoid damaging your printer on your beginning steps. For case, it'south very slow ... until you heighten Maximum Feedrate.
- You lot might take noticed that Teacup Configtool won't allow you lot to overwrite configuration files coming with the distribution. Uhm ... experience ... Use some other name.
- When seeing unexpected trouble, connect with a serial final to the controller or use Pronterface with Menu -> Settings -> Debug Yard-lawmaking turned on. Peculiarly more circuitous hosts do not ever send what you lot think they transport.
- If you even so take trouble, choose Menu -> Help -> Report Problem... This volition open your emailer with a few uncomplicated questions, ready to exist sent to the Github issue tracker.
Configtool troubleshooting
- When trying to upload, it just says "timed out"
- Timeout ways, at that place is no communications happening at all. Possible causes:
- Incorrect baud rate for the bootloader. Bootloader and firmware its self can accept unlike baur rates. While 115200 baud is the near ordinarily used speed, you lot tin can simply try all of them: 19200, 38400, 57600, 115200. It'southward set in Menu -> Edit -> Settings -> Upload Speed.
- Different type of bootloader. Depends entirely on who fabricated the board. Known values are stk500v2 and arduino. It'due south set in Menu -> Edit -> Settings -> AVR Programmer.
- Auto-Reset not working. Some boards merely don't feature it. Transmission reset works ever: Printing and release the Reset button a second before or later starting the upload. It's a two-mitt performance, 1 finger on the Reset button, the other manus at the computer mouse.
Installation using Arduino IDE
While Teacup Configtool should practice all you need, in that location might be some situations where you lot want to give Arduino IDE a try. Here'south how to do this:
- Especially on Windows, make sure you lot tin see file extensions. Vista is known to practise funny things when they're hidden.
- In example you accept an ATmega644, -644P or -1284P based electronics, also install Gen7 Arduino IDE Support.
- Before opening information technology with the Arduino IDE, rename the unpacked folder to Teacup_Firmware. E.thou. from Traumflug-Teacup_Firmware-448df5d to Teacup_Firmware.
- If you're using Arduino IDE 1.6.10 to 1.vi.9, delete these folders inside the toplevel folder: attic, simulator, extruder, and inquiry.
- Do basic setup like above.
- Card -> File -> Salvage board equally.... If your Arduino IDE is v1.0.x or earlier, save non, as offered by default, into config/, only straight into the main Teacup folder.[i]
- Same for the printer configuration.
- Menu -> File -> Save config.h.
And then you lot can open Teacup_Firmware.pde directly in Arduino IDE. If it asks to rename this file to *.ino, take this. It should build and upload.
Afterwards each configuration change, practise a Menu -> File -> Salve config.h in Configtool before uploading with Arduino IDE once more.
- ↑ The reason for this is, Arduino IDE copies all files into another directory and builds there. Unfortunately versions 1.0.x and before copy only files directly in the principal folder, not those in subfolders, and then board and printer configuration have to be in the main folder, too. Newer IDEs practise copy recursively ... and mess up even worse, some subfolders have to exist deleted.
Developer Installation
If you lot intend to alter more than than just the configuration, there are a few things you lot should consider. Especially the employ of Git, which makes it very like shooting fish in a barrel to bound between branches and likewise to fetch changes provided by others.
Before you report a bug, delight try the experimental branch first. This is where new stuff goes. Development happens in topic branches, so if your bug got fixed, it may well happen you lot're asked to checkout such a topic branch for testing. Once such a topic reaches satisfactory results, these branches are cherry-picked to experimental. Unless regressions appear, they're further forwared to master after a month or two. master is the stable branch.
The concept of topic branches ways, we do not merge. Merging is error-prone. Instead we follow more than recent development by rebasing these topic branches to experimental. So we crimson-pick good commits from the topic co-operative to experimental and refine the topic branch further. This goes on until the topic branch becomes empty and gets deleted. For more than details on best practices to do so, see Github issue #81.
Getting a copy of the Repository
git clone https://github.com/Traumflug/Teacup_Firmware.git && cd Teacup_Firmware
Edifice using the Makefile
Before edifice with make, it's a good thought to do a build using Configtool, commencement. This does all the required setups, especially creating config.h and thermistortable.h. After that you can change these files with a text editor, too, of course.
This done, copy Makefile-AVR (or Makefile-ARM) to Makefile:
cp Makefile-AVR Makefile
Most probable, Makefile needs some adjustments, like your type of ATmega and your serial port. These are collected at the top of the makefile, together with commented examples and some instructions. Edit them to your needs, then build:
make # compile and build teacup.hex brand plan # upload information technology to the controller
That's information technology, given you've dealt with all the upcoming errors, your controller is ready to go now.
Irresolute to another branch
git checkout <branch proper noun>
Updating the repository
This is a procedure which always works. Drawback of working with topic branches is, they don't always update smoothly, sometimes asking for manual conflict resolutions for things as small every bit a whitespace change. Co-operative principal does ever update cleanly, however (we go along it this way). This instance shows how to update the branch experimental (and chief too):
git checkout . # <=== Caution: this deletes all your uncommited changes (but not your configuration). git checkout chief git branch -D experimental git fetch --clip git rebase master origin/master git checkout experimental
The final command will create a new local branch on top of the remote one, exactly what yous need.
Keeping local changes
To keep local changes, y'all only create a local branch. Other developers won't even notice this local co-operative unless you button it to the cardinal repository. Let's name this co-operative mywork:
git checkout experimental git checkout -b mywork
That'southward it, now you can commit whatever yous want without fearing to mess things up! If you lot practice mess upwardly, simply delete this branch and start over.
To update with such a local branch, the above procedure changes slightly:
git checkout . git checkout master git fetch --prune git rebase principal origin/main git checkout mywork git rebase experimental
If you go conflicts, Git prints instructions on how to solve them.
Tuning for pocket-sized binaries
Teacup is the currently smallest RepRap firmware, so information technology's the natural choice for small controllers like the ATmega168 based Arduino Diecimilia, or Uno. Hints on how to become the binary even smaller:
- Don't employ Arduino IDE direct. Using Arduino IDE adds more than 2000 bytes and probable reduces functioning of the executable. No such penalty with Configtool using Arduino's compiler.
- Uncheck Enable EEPROM Storage in Configtool -> Printer -> Miscellaneous. Saving parameters in EEPROM is convenient, just non mandatory. You can use the hardcoded defaults instead (that's what you get initially, anyways).
- For less RAM usage, reduce Movebuffer Size on the same tab. Unless you have a very slow serial connection, you lot'll barely notice a difference between 4, 8 or sixteen. Only each slot in the buffer currently costs some 100 bytes RAM.
- Enable BANG Blindside Bed Control, as well on the Miscellaneous tab. Using BANG_BANG significantly reduces the size of the temperature command code.
- Remove Travel Limits (software endstops) in Configtool -> Printer -> Mechanical. This removes the lawmaking handling it.
- Uncheck Wait Ahead in Configtool -> Printer -> Dispatch. While very convenient, information technology can be commented out for very small CPUs. Saves over 3000 bytes.
Using the firmware afterward install
Before diving into press, you have to calibrate at least the basics: Triffid Hunter's Calibration Guide.
Very similar to all other firmwares, but default values are bourgeois to protect your mechanics. For example, college speeds require to set MAXIMUM_FEEDRATE, first.
Typically you connect with a press host, like Pronterface. GtkTerm, PuTTY, CoolTerm work as well. Commands are a subset of the ones for LinuxCNC and those for RepRap: Yard-code. For example, to move something yous transport G1 and the target coordinates in millimeter, like G1 X10 Y20 F500. F is speed in mm/minute.
Design Details and Tuning
While chances are good things get-go to work right after installation, a lot of details can exist adjusted for more comfort, less machine vesture or faster operation.
In general, everything is configured in the file config.h. After changing config.h, re-upload the firmware and the new settings should take effect. Config.h contains a lot of hints, run across likewise the following paragraphs.
Communications to the Host
Teacup Firmware has the adequacy to receive boosted commands while working on the first i. This avoids short stops between commands and volition allow for fifty-fifty more smooth transitions from one movement to the next in the future.
Baud Rate
For serial communications using the RS232 protocol, the baud charge per unit can exist set in config.h. The default is
#define BAUD 115200
which has been shown to exist a proficient compromise betwixt speed, compatibility and reliability. Lower baud rates, like 57600, 38400, 19200 might exist more successful in electrically noisy environments. College baud rates should work, as well, and have notwithstanding to be tested.
XON/XOFF Period Control
Teacup Firmware has XON/XOFF menses control implemented. This is not needed when sending G-code files with RepRap Hosts, just quite helpful when sending files with a serial concluding emulator (GtkTerm, CoolTerm, HyperTerminal, etc.).
This feature is off by default, turn it on in config.h by uncommenting
#define XONXOFF
Direct USB
Teacup Firmware supports using direct USB on ATmegas equipped with this, like the ATmega32U4 on the Teensy board. Enable this by uncommenting
#define USB_SERIAL
in config.h. The config.teensy.h template has this uncommented by default, so things should work out of the box.
SD carte support

The reddish oval marks the board pin for enabling SD card support.
On AVR based controllers, printing from SD bill of fare is supported, commands M20 to M25 are implemented. To enable (or disable for a smaller binary size) it, simply choose the Chip Select pivot of the SD carte adapter. All other pins are given by the lath design, so Teachup chooses them automatically.
Scrap Select is not to be confused with Card Detect. Carte Find is useless, so it's ignored.
To check SD carte du jour back up, ship a M21, then a M20 to the controller. It should list all files in the top level directory of the carte.
Supported filesystems on the SD card are FAT16 (typical for cards up to ii GB) and FAT32 (typical for bigger cards) in a partition-less book.
For those who intendance about binary size of the firmware: SD card support counts in at merely 4.5 kB on AVR. Information technology uses Petit FatFs past ELM ChaN. Excellent library if you intendance about size.
SD card Troubleshooting
- Sending M21 reports something like Bad Thousand-lawmaking M21..
- SD card back up isn't compiled in, SD_CARD_SELECT_PIN isn't divers at all. Check that.
- Sending M21 reports E: SD init failed..
- SD card support is compiled in, but communications with the menu doesn't work at all. Either due to the wrong Fleck Select pin choosen, a poorly seated card or ... is in that location actually a menu in the slot?
Pin configuration
In the file config.h, functions should be assigned to ths mcu's pins. The pins names should exist AIOx or DIOx, with x a number.
- AIO stands for Analog Input Output
- DIO stands for Digital Input Output.
These names are references to the Arduino boards.
If you use your microcontroller documentation to assign pivot to functions, you will become a port proper noun and a pin number. You volition accept to convert your pin into a AIOx or a DIOx. You have two manner to do it :
- you take an electric shematic of an Arduino board which utilise the same microcontroller and look at the respective name.
- you open up the file arduino_.h and look at the corresponding proper name of your pin. In this file your pin will exist named PINxy, with x the name of the port and y the pivot number
Here is what you tin can detect in the file arduino_168_328p.h :
#define AIO3_PIN PINC3 #define AIO3_RPORT PINC #define AIO3_WPORT PORTC ...
We can see that the pin iii of the port C is chosen AIO3 past Teacup
Heater & Fan Setup
Extruders, heated beds, fans, milling spindles etc. have at least one pin to plough the device on and off and optionally a temperature sensor to control its temperature. Devices with a temperature sensor are controlled by M104, such without one by M106. Additionally, there's M140, which is a special case of M104 for the heated bed.
Adding or removing heaters ( = general devices) and temperature sensors in Configtool is pretty straightforward and to be institute on the board tab. In instance you want to define a pair, define the heater get-go. A heater and a sensor of the same name make upwards a pair. There tin exist every bit many heaters every bit you take pins to spare and as many sensors as y'all have heaters, plus 1 heaterless sensor.
As you might know already, thermistors require a translation table. Configtool will create this table on the fly, merely select your type from the menu of presets or enter your custom values. As e'er, there are tooltips all over the place to give detailed help.
Annotation: there'southward no obligation to accept a heater or sensor at all. If your car has no such stuff, remove all of them. Stepper motors volition continue to work only fine, performance might be a fleck better, binary size will exist smaller.
Kinematics
The KINEMATICS keyword in config.h defines which type of kinematics your printer uses. If y'all have a CoreXY printer, change this
#ascertain KINEMATICS_STRAIGHT
to
#define KINEMATICS_COREXY
Equally always, there'south a clarification in the config.h templates. Default is KINEMATICS_STRAIGHT (for "ordinary" printers like Mendel, Mendel90, Prusa i3). Scara support (RepRap Morgan) is already in the works, Delta support shouldn't be too hard to add as well.
Distances and Velocities
Default Feedrates are set quite dull, to encourage you to adjust them to match your hardware.
Distances as expressed in steps
/** \def STEPS_PER_M steps per meter ( = steps per mm * grand ) summate these values appropriate for your motorcar for threaded rods, this is (steps motor per turn) / (pitch of the thread) * chiliad for belts, this is (steps per motor turn) / (number of gear teeth) / (belt module) * chiliad one-half-stepping doubles the number, quarter stepping requires * 4, etc. valid range = 20 to 4'0960'000 (0.02 to 40960 steps/mm) */ #define STEPS_PER_M_X 320000 #define STEPS_PER_M_Y 320000 #define STEPS_PER_M_Z 320000 /// http://blog.arcol.hu/?p=157 may assist with this i #define STEPS_PER_M_E 320000
These values have to match your electronics, in that location is only i correct value for each centrality. Movements actually moving the allowable distance bespeak correct STEPS_PER_M settings.
Most electronics permit to change microstepping. Doing so requires to alter STEPS_PER_M, too. A high level of microstepping increases resolution and reduces noise, but requires more processing per unit of motion. In December 2013 Teacup was tested to generate a maximum of about 48'000 steps per 2d on a xx MHz CPU, which translates to 600 mm/due south on a typical belt driven centrality with i/16 microstepping, so there'south not much reason to not use such a setting.
Velocities in mm/minute
/// used for G0 rapid moves and as a cap for all other feedrates #define MAXIMUM_FEEDRATE_X 200 #define MAXIMUM_FEEDRATE_Y 200 #define MAXIMUM_FEEDRATE_Z 100 #define MAXIMUM_FEEDRATE_E 200
These values should be calibrated for each axis seperately. Here's a process to observe the maximum possible values:
- Set acceleration very low, similar 100 mm/due south2 on a threaded rod driven centrality or 500 mm/southward2 on a chugalug driven centrality.
- Set MAXIMUM_FEEDRATE very high, like 30000 mm/min.
- Ship movement commands, starting at a feedrate of 100 mm/min (G1 Z50 F100). Move some 50 mm each fourth dimension, longer distances equally speeds increment.
- Raise the feedrate some amount each fourth dimension, like F100, F120, F150, F180, ...
- Find out how far y'all tin can go. A sudden slowdown to a crawl typically ways the ATmegas' processing power is exhausted. A motor suddenly stalling and beeping ways your motor doesn't accept enough torque for such a speed. There are other mechanical limitations, of class.
- Reduce the feedrate a chip until stuff works again. Bank check repeatedly with 200 mm moves.
- Reduce this by some xx% to have a safety margin. This is the MAXIMUM_FEEDRATE you want.
Adaptive homing feedrates
When doing homing movements (G28, G28 Ten, G28 Y and similar), there's some other thing to consider. Other than most firmwares, Teacup doesn't halt apruptly when striking the endstop, but decelerates smoothly to salve your mechanics. This ineviteably means the wagon moves somewhat over the endstop trigger point. The farther the college your speed is.
To allow highest homing feedrates while keeping compatibility with your hardware, Teacup asks for an endstop clearance altitude. Set this to the distance your carriage tin movement over the endstop trigger bespeak without crashing. On mechanical endstops this tin can exist brusque, similar 1 mm, on optical endstops you typically have more than clearance, like x mm. Put there whatsoever matches your hardware, a fleck less if you're non sure.
Units: micrometers Sane values: 0 to 20000 (0 to twenty mm) Valid range: 0 to meg #define ENDSTOP_CLEARANCE_X 1000 #define ENDSTOP_CLEARANCE_Y yard #define ENDSTOP_CLEARANCE_Z 100
Teacup firmware volition make sure your carriage never exceeds your endstops more than than this distance, still getting in that location as fast every bit possible. And, peradventure yous already guessed it, increasing ACCELERATION means shorter breaking distances, then higher ACCELERATION values also mean higher homing feedrates.
Yous tin can set this altitude to goose egg. In this case, SEARCH_FEEDRATE is used. Expect minutes for homing movements.
A value of minor importance is SEARCH_FEEDRATE. It'southward used equally default feedrate (before receiving the first F control) and for this short movement after hitting an endstop, searching the endstop more than precisely.
Units: mm/min #define SEARCH_FEEDRATE_X 50 #define SEARCH_FEEDRATE_Y 50 #define SEARCH_FEEDRATE_Z 50
With high endstop clearances it can brand sense to increase these values a bit.
Constant Dispatch
Existent-world machines/printers can't gain full speed instantly, so a defined acceleration is actually a requirement. Trying to do without results in printer frame angle, early on wearing of mechanical parts and/or plain stalling when trying to move fast.
Teacup Firmware contains a constant acceleration implementation.
Acceleration, RepRap Fashion
This matches the strategy of the official firmware around the Darwin / early Mendel days. Each motion starts at the speed of the previous command and accelerates or decelerates to accomplish target speed at the end of the motility.
Goal of this strategy is to allow calculation of smooth movements in the host software. If advice between host and controller gets delayed, difficult stops and starts are to be expected. This strategy isn't useful for commands issued by manus, either.
Yous can go this behaviour in config.h past uncommenting
#define ACCELERATION_REPRAP
Acceleration, Start/Stop Ramping
This variation guarantees always shine starts and stops, as all dispatch and deceleration is calculated in firmware (and actually uses less code than the above). Each movement starts at (almost) no speed, linearly accelerates to target speed and decelerates just in time to smoothly stop at the target. Implementation is expected to be accurate enough to avert any footstep losses at all. Some users run their printer for weeks without a single miss.
An oft wanted feature of first/stop ramping is to join singled-out, but like moves without a full stop in between, keeping motility speed. This is chosen "lookahead", meet below.
Nigh current One thousand-lawmaking generators await RepRap-fashion acceleration. Y'all tin can use only ane style of dispatch. To use start/stop ramping, turn off ACCELERATION_REPRAP in config.h, then turn on:
#define ACCELERATION_RAMPING #ascertain Acceleration l.
The first #define turns the feature on, the second 1 defines acceleration steepness in mm/southward2. Smaller values requite slower, higher numbers quicker dispatch, useful range is 1. to 10'000. A good starting signal is 10. for milling (high precision) or 1000. for press.
Tune dispatch to what you recollect your motorcar can achieve and how much bending of your printer you want to allow. Sturdier machines curve less at high acceleration, weak machines need a smaller value to keep reasonable printing accuracy.
Also, it's pointless to try to advance faster than your steppers torque / axis weight can bargain with, of grade. If your motors just stall subsequently raising acceleration, yous wanted too much.
Endstop Handling
For efficiency reasons (and to avert ruined prints when endstops get imitation triggers) the endstops are only checked during homing operations.
To test an endstop, transport K-code M119. This shows yous the status of all configured endstops. Trigger the endstop and send M119 once more to run across it working. If an endstop runs inverted, uncomment X_INVERT_MIN, X_INVERT_MAX, Y_INVERT_MIN, etc. in your config.h (or comment it out if it was uncommented already).
When connecting mechanical endstops, NC (normally closed) as well as NO (normally open up) types are supported. For using ATmega's internal pullup resistor, watch out for USE_INTERNAL_PULLUP. It is normally configured through Configtool under the Printer tab -> Miscellaneous -> second from top in the left cavalcade.
Lookahead tuning
Lookahead is a machinery which avoids halting betwixt ii adjectant moves if the direction of movement is similar enough. This not only increases overall press speed, it also avoids blobs from the extruder at each corner.
For lookahead, you'll notice these entities in config.h:
#define LOOKAHEAD #define MAX_JERK_X twenty #define MAX_JERK_Y 20 #define MAX_JERK_Z 0 #define MAX_JERK_E 20
The first one has to exist uncommented (like shown) to get lookahead at all.
The tuning part is, how much can y'all change speed of an axis instantly without suffering step losses. This is what the other four lines draw, one for each centrality. To change management without halting and without moving a curve, axis have to change speed instantly and the numbers tell how big this speed alter can be. A value of 20 means, speed (of an centrality) can alter by twenty mm/min instantly, due east.g. from 2000&mm/min to 2020 mm/min.
If the numbers are too low, Teacup will slow down unneccessarily between adjectant moves. Appropriately, if the printer runs your Grand-code abiding speed, there'due south no point in raising the numbers.
If the numbers are too high, you'll suffer step losses or (as well) severe bumps in the axis driving machinery. If the printer suddenly halts an centrality at a corner, steppers are just beeping, lowering the numbers are a good idea.
As always, default values are on the prophylactic side. 20 is fine even for threaded rod driven axes. Belt driven axes tin can typically go much higher, like 200 or 500. For the Z axis you likely want to go along cipher, this ensures a total terminate earlier and later each Z motion.
Canned G-code
Teacup has an option to run G-code compiled right into the binary. Comment out the string below CANNED_CYCLE in config.h and adjust it to your needs. This Grand-code will exist executed in a loop, without any user interaction or even a serial connection. The only ways to stop this are to cut off power, hold down the reset button permanently or to upload another firmware.
Developer Section
If you feel comfortable with hacking the source code, read on ...
Design Goals
- No dependence on Arduino libraries
- Easy to read and modify the source code
- 100% integer computations
- Serial transmit buffer
- Can fit (with a sparse config) onto an ATmega168
- Works on ATmega328P and larger ( = 644, 644P, 1280, 1284P, 2560)
- Works on ATmega32U4 used past Teensy (http://www.pjrc.com/teensy)
- C89 compatibility, no C++
Patches
If you have a change or a patch you desire to discuss, or if yous don't have github commit access, delight upload the patch hither.
To apply patches, type git employ in your last, inside your local copy of git repo, so copy the text given here into the last and hit ctrl-d.
If you work with git on Teacup Firmware, please do commits in small pieces, 1 topic/bug at a time. This helps a lot in reviewing patches. That done, you can create a set of patches easily:
git format-patch --keep-subject -o out origin
You'll find each of your patches in the out/ directory, nicely equipped with a mail service header and a proper file name.
Enhancements
Teacup has some topic branches and forks with additional features:
experimental is the development branch. All new developments go here, then if you want all the latest fixes and features, get this one.
multi-extruder: equally the proper name says, support for multiple extruders. A scrap behind with other features, though.
External ARM ports, which were washed before a generic ARM port appeared in August 2015:
- R2-C2 port,
- Multiarchitecture ARM ports forum post or github
Running Teacup in a simulator
Teacups' high technical quality has a reason: you can run it in a simulator and precisely view every unmarried step.
Teacup on i386 hosts
That's right, Teacup compiles and runs on an i386 just fine. You can't (nevertheless) run a stepper this way, but it's splendid to check accurateness of new algorithms. To do so:
brand -f Makefile-SIM ./sim
That'southward it, now you can run it and feed Yard-code on the command line. Stuff ordinarily going to the serial line is written to the console. Only fine for printf-type debugging. And very fast, much faster than realtime.
Teacup in SimulAVR
Teacup is prepared for running in SimulAVR, a bicycle-accurate simulator. This is quite a scrap slower than realtime, just information technology allows you to record pin changes (motor steps!) accurate to the nanosecond. It also allows to connect a debugger to the running binary. And the all-time of all: the binary is exactly the same as the one sent to real hardware, so you can be very sure simulation results friction match what would happen on this hardware.
To work with SimulAVR, put information technology'due south source lawmaking directory side by side with Teacup ones'. Makefile tests for ../simulavr/ and if it finds information technology, information technology'll exercise everything neccessary.
Edifice for SimulAVR is and so simple, it'southward exactly the same as building for the real controller (and yeah, you tin can run the binary for the controller in SimulAVR and vice versa):
make -f Makefile-AVR
| | Note Build for an ATmega644 (without 'P'), as this is the ATmega variant patently supported best by SimulAVR. For simulation purposes, ATmega644, ATMega644P, ATmega1284P, etc. are all the same anyways. |
Running Teacup isn't besides complex, also:
../simulavr/src/simulavr -f build/teacup.elf
More than details and on how to adhere GDB are described on the SimulAVR page.
Getting these graphs ...

... is a chip more complex. That'south why a script is prepared to practise the hard work:
cd testcases ./run-in-simulavr.sh <your g-lawmaking>.gcode
- This will run the simulation until information technology hits a M2 in the Yard-code, until the Yard-code ends, or until you lot hit Ctrl-C on the command line and results in a file <your g-code>.processed.vcd. Length of the 1000-code file is arbitrary, but notation that simulation in SimulAVR on a article PC is about 5 times slower than running on the real controller.
- Open the .processed.vcd in GTKWave or another viewer for VCD files.
- For user-friendly viewing of speed ramps, choose Menu -> File -> Read Save File and so salvage-file-velocities.gtkw.
And so yous can view every unmarried step, even measure how long or how brusk a single step pulse is (betoken X_step, Y_step, etc.).
Doing precision profiling
The principle of timing code sequences is shown in SimulAVR#Doing precision fourth dimension measurements.
Here's an case timing stride interrupt when running testcases/brusque-moves.gcode with code from June 2014:
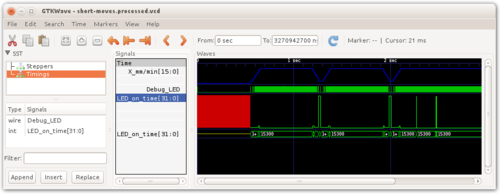
The blue curve shows X axis speed for orientation. The 2nd row shows the Debug LED signal, which you tin measure as shown on the SimulAVR folio.
The bottom 2 rows show a derivative signal which you get when running the simulation with ./run-in-simulavr.sh short-moves.gcode. It'due south both times the same point, once shown analog, once shown as decimal number. The derivative is the time between the last raising and the last falling flange, so y'all get a pretty good idea of where the step interrupt is fast and in which situations it falls behind average (these spikes upwards). As you can encounter, the interrupt is usually pretty fast with 15300 ns = 328 clock cycles, but besides has spikes upward to over 700 clock cycles loftier where one M-lawmaking command ends and the adjacent one begins. This added time is likely the time taken in dda_start().
For even more than convenience, run-in-simulavr.sh also prints a statistics to the terminal information technology runs in:
$ ./run-in-simulavr.sh short-moves.gcode Bold pin configuration for a Gen7-v1.iv + debug LED on DIO21. [...] Statistics (bold a twenty MHz clock): LED on occurences: 838. Sum of all LED on time: 262055 clock cycles. LED on time minimum: 306 clock cycles. LED on fourth dimension maximum: 717 clock cycles. LED on fourth dimension average: 312.715 clock cycles.
Savor!
Toolchain for ARM
Teacup uses GNU Tools for ARM Embedded Processors, a toolchain provided and maintained past ARM, the chip blueprint company, its self. This toolchain is built effectually arm-none-gcc-eabi. Additionally you demand make. Third neccessary part is an uploading tool. Gen7-ARM's LPC1114 needs lpc21isp. Long story short, this should install all you need on Ubuntu:
sudo apt-get purge gcc-arm-none-eabi # ignore errors sudo apt-get purge binutils-arm-none-eabi # ignore errors sudo add together-apt-repository ppa:team-gcc-arm-embedded/ppa sudo apt-go update sudo apt-go install build-essential gcc-arm-embedded lpc21isp
Arduino IDE uses the same toolchain, and so it should be possible to brand an addition package for this. This should include lpc21isp binaries for all common operating systems (Linux, Mac Bone, Windows), because Arduino natively uses Bossa, which supports Atmel SAM devices merely.
Porting to other (ARM- or not-ARM-)platforms
The generic ARM port makes a nice tutorial for porting even more than platforms. The unfortunate thing with all the ARM flavours is, each of them requires pretty much a unique port. The adept thing is, the tutorial leads you through all the pieces step by step, so it's much less overwhelming.
Tools
- arm-none-eabi-gcc
- brand
- A clone of MBED.
- A tool to upload the congenital firmware to the controller.
Initial steps
Become a re-create of the Teacup repository:
git clone https://github.com/Traumflug/Teacup_Firmware/tree/experimental cd Teacup_Firmware git checkout experimental
Find out how many commits happened since the generic ARM port. Write down the number this control outputs, we'll afterward refer to it as NUMBER:
git log --oneline --ancestry-path arm-ports-offset-here..experimental | wc -l
Last initial step, become to the starting point:
git checkout arm-ports-get-go-here gitk --all&
The latter gives you a graphical GUI, which helps tremendously for orientation within the repo.
Porting steps
Being at the starting betoken of a new tutorial phase, read what the commit message says. Implement the stuff what the generic ARM port did, simply for your chip. Non more, but likewise no less. Copy files every bit neccessary from MBED. Create a Makefile for your platform. Exam it. That's the actual porting work. If you run into trouble or abiguities, Teacup developers can help at Github's event tracker.
If yous remember you're done, run regression tests:
make regressiontests
Note that no commit not passing regression tests will be accepted to mainstream, not fifty-fifty intermittent ones. If regression tests succeeded, commit your work (you can commit earlier, of class) ...
git add together <new files> # <== add new files here, if whatsoever; else they'll exist forgotten git commit -a # Type a short description of what works now, perhaps test results, binary sizes, etc.
... and enter the adjacent stage. To find the adjacent stage, we need the NUMBER. Decrement it past one, and then practise this:
git rebase experimental~<NUMBER>
There may be conflicts, Git command line will write instructions on how to solve them. Usually past opening the file with the conflict and deciding which version shall remain, then doing git add and git rebase --go on. Afterward having washed and so, select Menu -> File -> Reload in Gitk and look at the event. You should see your piece of work branching off of the series of commits leading to experimental. As the port goes on, you'll climb this ladder up, stride by step.
Having this done, y'all resolved one stage and tin keep with the next 1 by reading its commit message. The ladder of commits for the total port has 87 steps, so you lot should get this circular 87 times. No sweat, many of them crave no piece of work of yours at all, and so yous tin can climb them in a minute or 2. Simply run regression tests and rebase again.
Final porting steps
Final and most important step is to bring your work into the official Github repo. If y'all don't, your piece of work is likely forgotten before long. Personal forks happen to get not much public attention.
Getting contributions into the official repo is piece of cake. Open a Github issue for it, if you din't do so earlier already. Developers providing lawmaking ever get write access. You tin can also email a patch series. A Pull Request is another mean to pick upward give-and-take.
Teacup developers very happily have code, they even fix whitespace issues and other small stuff them selfs. Notwithstanding there might be some remaining open up questions after review. Or a few fixes which need testing. And then delight don't run away immediately, you're the only i with the hardware required for testing, Teacup developers count on you.
In one case the port is in mainstream, you'll go all updates, bug fixes and new features for free. A regression examination or two will make sure others don't pause your code. Your platform is a full citizen of Teacup, and so.
Rationale and History
Triffid Hunter's Original Blog Post
I started building my electronics with only a regular arduino to test with. This was perfectly sufficient for playing with the pololu stepper controllers and the max6675 I bought after reading about all the problems with thermistors that people were having. After a while I decided to cheque out the official firmware but information technology required an atmega644. I wondered why. And so, I decided to skim through the code to see what took upwards then much space. From what I could meet, it was written by someone who was familiar with programming desktop systems and larger embedded devices, but didn't have much experience with small-scale devices such as the atmega168 and atmega644. This showed in the use of C++ which served only to make the code harder to read, and the prolific apply of floating-point math, with some appearing even in interrupt context! I came to the decision that at that place was no reason that the main body of lawmaking couldn't fit onto an atmega168 except for the burdensome and unnecessary overheads from object-oriented code and floating point math. A quick count assured me that the atmega168 had enough pins, merely but barely, and I started reading the official firmware properly, with an eye to rewriting equally much as possible in a style suitable for small-scale microcontrollers.
Starting with an arduino skeleton library I had assembled over time, some of my test code and the official firmware, I hacked up a passable integer-only, straight C implementation of the dda, and wrote my ain gcode parser from scratch which candy each graphic symbol as it arrived (with some buffering of course) instead of waiting for a whole line and then trying to procedure it all at once.
As soon as my new firmware was able to run a few consecutive moves, I released information technology for peer review.
The forum thread http://forums.reprap.org/read.php?147,33082 has much of the history from this point on.
Traumflug was the outset to ship patches, and has washed a meaning amount of piece of work on a number of different parts of this firmware. Jakepoz ported it to gen3 branch electronics. Cefiar posted me some thermistors to sponsor addition of thermistor-reading code
Many others have given encouragement and suggestions without which this firmware may never be what information technology is today.
Architectural Overview
Teacup Firmware is quite similar to the official firmware in some ways, and markedly dissimilar in others. Teacup Firmware has every bit much modularity as I could get away with without sacrificing efficiency.
At startup, the code in mendel.c is run first. This initialises all the modules that need it, and then starts polling the clock flags and feeding incoming serial characters to the gcode parser. The gcode parser processes each character individually, keeping track via internal state rather than buffering a line and skipping back and along. The gcode parser converts floating values to integer or fixed-point representations as presently equally information technology encounters a non-numeric graphic symbol. It calls many module functions direct, just the about interesting part is motility creation, where it passes a target position and speed to enqueue()[dda_queue.c] which adds it to the queue, and fires upward dda_start()[dda.c] if the queue was empty. dda_start initialises the dda, figures out the stepper directions and first pace timeout and a few other bits of housekeeping, then sets the timer for the appropriate timeout. When the timer fires, it calls dda_step()[dda.c] which sends all the step signals and then figures out the next step timeout based on acceleration and speed settings. When the last stride has been made, the dda "dies" (sets 'alive' property to 0) after which queue_step[dda_queue.c] advances the queue read pointer and starts the side by side dda.
It is necessary to keep interrupts very short on small microcontrollers, and I have endeavoured to keep them all as brusque as possible. Unfortunately, dda_step[dda.c] is fairly large. I but hope that information technology doesn't take so much fourth dimension that it interferes with the other interrupts too much.
Interesting code sections
The serial ringbuffers are critical for good communication, but for some reason the official arduino libraries don't implement a tx queue, all but preventing sending stuff from interrupt context. As long as the queues have a length of two^n, we tin use bitwise operations rather than numerical comparison to trim the read and write pointers. The serial ship function (serial_writechar[series.c]) is necessarily conscientious about checking if information technology's in an interrupt and only waiting for space in the queue if it's not. The dda queue is also a ringbuffer, although its implementation is harder to see as it's embedded in lots of other stuff.
The gcode parser shows how to parse each character as it comes in, and so 99% of a command can be processed earlier the EOL is even received. Information technology started off as a simple state machine, which then grew and shrank and morphed until information technology was both smaller and more functional.
The fixed-point stuff is fun, although we have to manually ensure that the decimal point stays in the right spot. decfloat_to_int[gcode.h] is used to convert incoming floats to integer implementations by starting off with a (very!) rough floating bespeak implementation, then choosing appropriate scaling factors inside the gcode parser itself. This allows us to do a petty stuff that looks like floating-point math without the burdensome overhead of a full fp implementation.
The PID code in heater.c is probably quite generalisable, and seems to work well when tuned. Google knows of enough of PID tuning guides.
File descriptions
| File | Clarification |
|---|---|
| analog.[ch] | This is the analog subsystem. Simply used if you have a Thermistor or AD595. |
| arduino.h | Pin mappings and helper functions for various arduinos ('168/'328-based, '644-based, '1280-based. |
| clock.[ch] | A system clock for periodic tasks. Supports a long-running clock, but this is disabled by default as zilch uses information technology (yet!). |
| copier.[ch] | A totally untested and currently unused chunk of code for copying firmware to another identical bit. |
| dda.[ch] | A rather circuitous block of math that figures out when to step each axis according to speed and acceleration profiles and received moves. |
| dda_queue.[ch] | The queue of moves received from the host. |
| debug.[ch] | Debugging aids. |
| Teacup.pde | Allows firmware to exist built in Arduino IDE |
| func.sh | Lots of host-side shell scripts for talking to firmware. |
| gcode.[ch] | Gcode interpreter. Scaling of factors to internally used integer or fixed indicate happens here too. |
| heater.[ch] | Heater direction, including PID and PWM algorithms, and some configuration parameters. |
| automobile.h | Configuration variables to lucifer firmware to your hardware. |
| Makefile | instructions for brand on how to build firmware. has a list of modules to build which may demand to be updated every so oft. |
| mendel.c | Firmware startup and main loop code. |
| pinout.h | This file associates various functions with particular pins on your avr. |
| README | This file. |
| sender.sh | A elementary talker. Needs "waitfor" |
| series.[ch] | Serial management and buffers. |
| sermsg.[ch] | Functions for sending letters and values to host. |
| sersendf.[ch] | A modest, crude printf implementation. |
| temp.[ch] | Temperature sensor management, includes some configuration parameters. |
| timer.[ch] | Timer management, used primarily by dda.c for timing steps. |
| watchdog.[ch] | Watchdog management. Resets chip if firmware locks upwardly or does something strange. |
Source: https://reprap.org/wiki/FiveD_on_Arduino
0 Response to "Reprap Homing Doesnt Bump Check Again"
Post a Comment