Responses Finished in Qualtrics Are Not Updating Uploading
That's great! Thank yous for your feedback!
Thanks for your feedback!
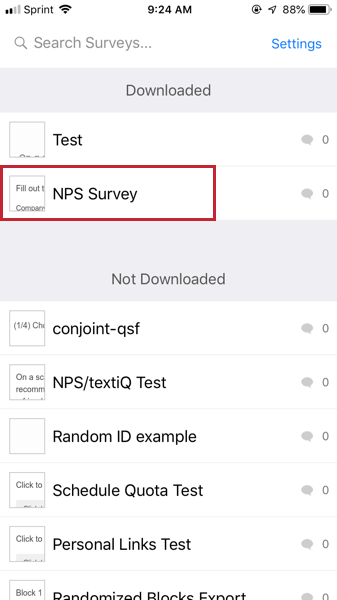
Near Collecting & Uploading Responses
One time you've fix the Qualtrics Offline Surveys app on your device(southward) and downloaded your surveys, yous tin can start collecting responses.
Collecting Anonymous Responses
With the following method, y'all can collect survey responses that are not associated with a contact list.
- Tap your downloaded survey.
- Tap Accept Survey.
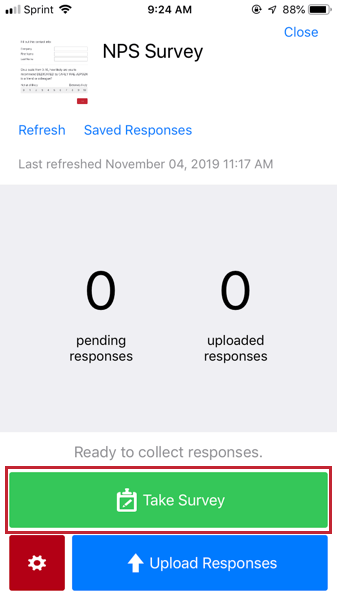
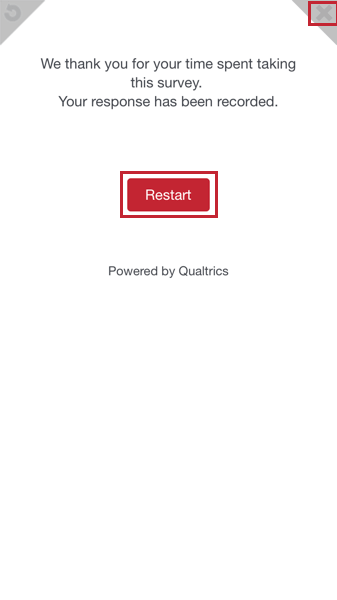
- Complete the survey.
- Click Restart to start a new survey session or click the X in the upper correct to return to the survey screen.
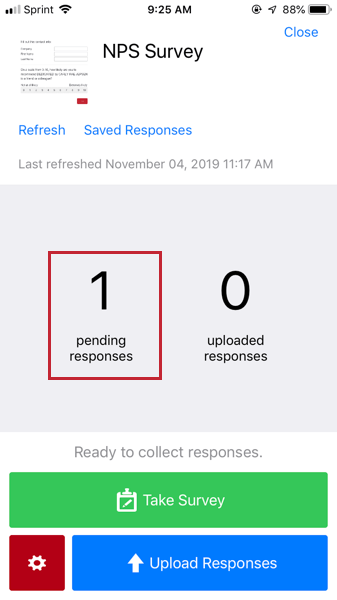
When a survey response is completed, the Awaiting Responses count increments.
Collecting Individualized Responses
Offline app responses don't accept to be anonymous. If yous've created a contact list in Qualtrics, you tin can utilize this list to associate each offline response with a particular contact.
- Upload a contact list to your account.
- In your offline app, navigate to the survey you downloaded.
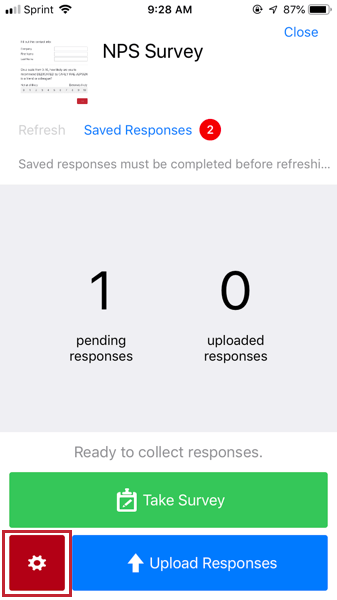
- Click the red button with a gear icon to become to the Manage carte.
- Click View Contacts.
Qtip: In order for contact lists to display in the Offline App, your account must have the Access API permission enabled. Contact your Make Administrator if y'all need the permission enabled.
- Click on the desired contact list.

- Click on the respondent who is filling out the survey.

This feature works much like emailing a survey to a contact list. If yous have saved Embedded Data to your contact listing, and added the same Embedded Data to the Survey Flow, and so this information will be saved with the respondent's completed offline app response.
Qtip: On the offline app, you can take the survey every bit many times as you desire for a contact list member! If you are familiar with emailing surveys, this means that the offline app'due south View Contacts feature functions more like a multiple completes link than an private link.
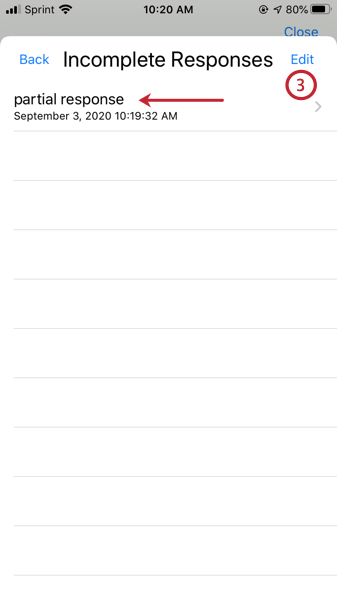
Incomplete Responses
Sometimes y'all or a respondent will non be able to finish answering survey questions all at in one case. In these cases, you lot can save the response equally incomplete and render to it later.
To relieve an incomplete response
- At any indicate in a survey, tap the X in the upper-correct corner.

- Type a description for the response.

Qtip: Giving a articulate description for a response in progress will help you afterward when you lot want to return to that specific response and end.
- Click OK.

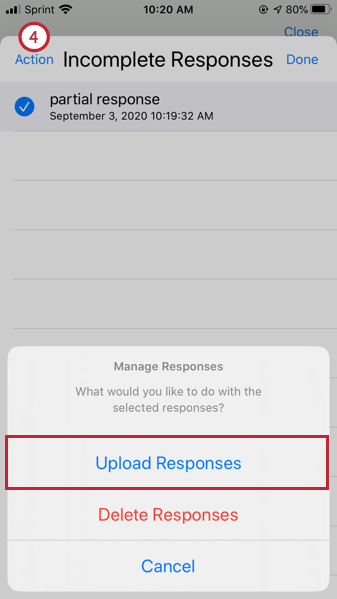
To manage an incomplete response
- Navigate to the survey screen.
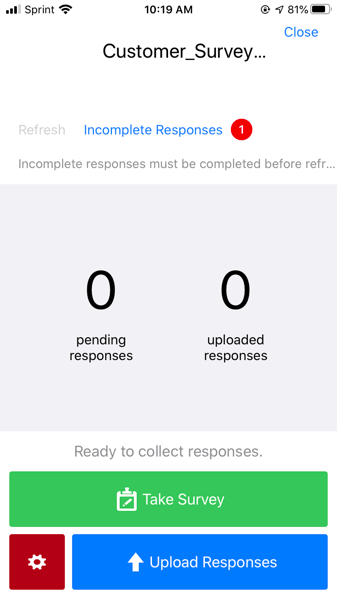
- Tap Incomplete Responses.
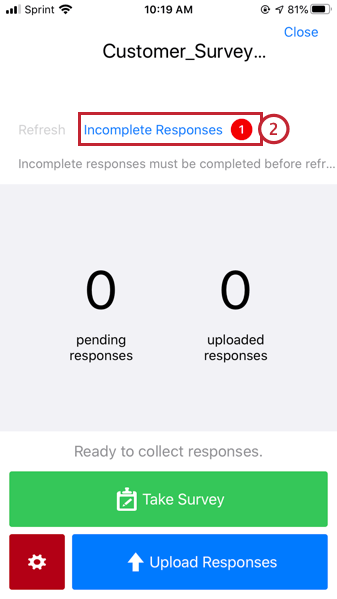
- Tap the incomplete response you want to manage.
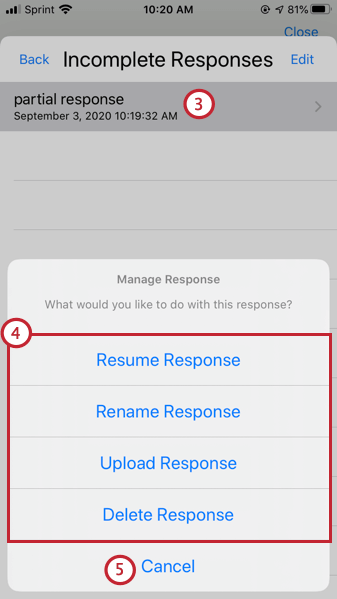
- Choose what activity you want to have (resume, rename, upload, or delete the response).
- Tap Abolish to render to the survey screen.
Qtip: If you tap Edit, you can select and manage multiple incomplete responses at once.
Respondent Experience
Surveys on your mobile device will function similarly to surveys on a full-size computer, though question layout may slightly modify to accommodate the smaller screen size. For example, some mobile devices will testify a selection box equally a dropdown list.
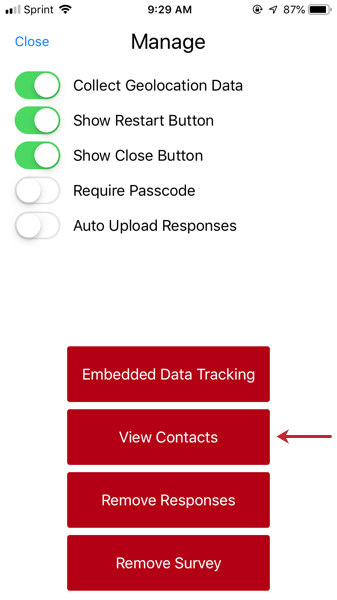
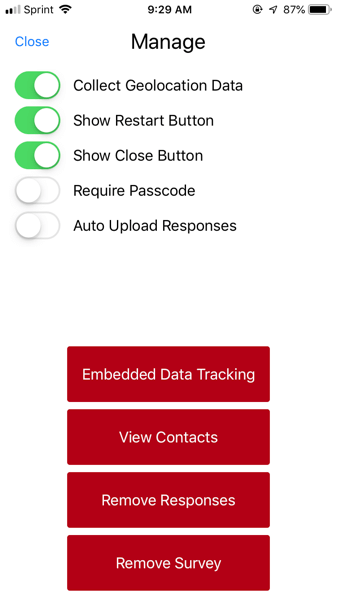
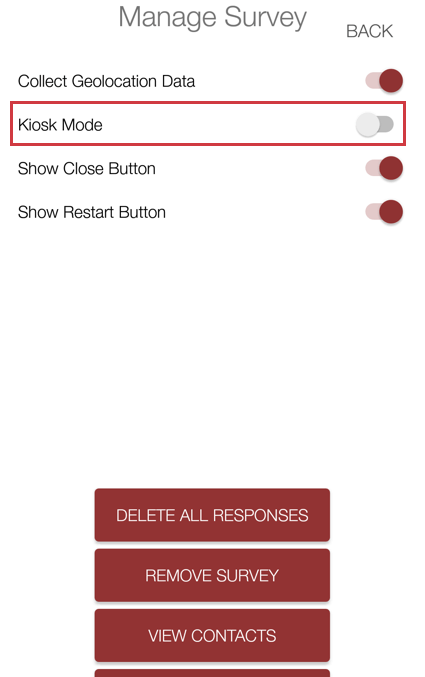
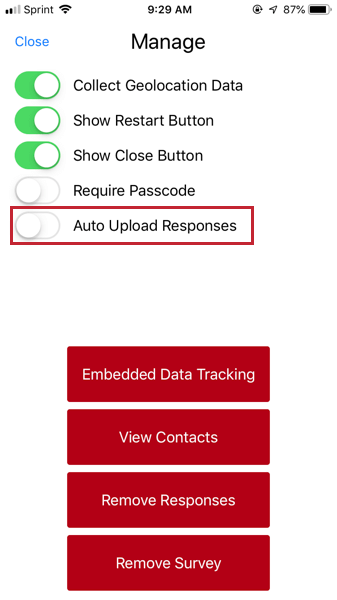
You lot can customize your respondent experience in other means though by using the Survey Settings options. You tin can detect these Manage options past borer the red button with a gear icon on the bottom left of the survey overview window.
- Collect Geolocation Data: Provided your device is set to collect geolocation information, the survey volition salvage this data with each response. If your offline app has no data or wi-fi connection, the final location recorded on your device will be saved with the response.
- Kiosk Style: Hide the close button and limit how long respondents accept to take the survey. Not available for iPhones or Windows.
- Show Restart Push button: Let respondents to restart their survey session past tapping on the circular arrow in the upper left paw corner of the survey (turned on past default).
- Bear witness Close Push button: Permit respondents to exit their survey session past borer on the X in the upper right hand corner of the survey (turned on by default).
Qtip: Demand to close a survey that doesn't have a close push? But tap on the survey twice with three fingers and a shut push will appear.
- Crave Passcode:Requires respondents to enter a passcode earlier exiting out of the survey without finishing.
- Auto Upload Responses: Automatically uploads your survey's responses once your device is connected to internet.
- Embedded Data Tracking: Go on track of the Embedded Information collected with your responses. Encounter the linked section beneath for more data.
- View Contacts: View your account's contact lists and collect survey responses for the desired respondents. See the linked sections beneath for more information.
Qtip: In order for contact lists to brandish in the Offline App, your account must accept the Access API permission enabled. Contact your Make Administrator if yous demand the permission enabled.
- Remove Responses: Permanently delete all offline responses from the current survey. Responses that have already been uploaded to Qualtrics will not be affected.
Warning: Once responses are removed, they cannot be restored.
- Remove Survey: Remove the survey from the list of downloaded surveys. You will need to download the survey again to collect more responses.
Embedded Information Tracking
Allow's say your Survey Flow has a series of branches. When a respondent answers less than 18 to an age question, a co-operative assigns them to an Embedded Data element named "Age Group" with a value of "Underage." Peradventure you utilise Embedded Information to characterization when a respondent has completed a certain condition. Or perhaps you've saved Embedded Data in your contact list to indicate personal data such equally gender and employment date of your contacts.
The Embedded Data Tracking feature is splendid for keeping track of what Embedded Data has been nerveless in your responses. This fashion, you tin keep rail of what demographics are responding to your survey.
Before you lot can utilise this characteristic, at that place are several steps you have to have.
Preparing to Rail Embedded Data
Before collecting responses, make sure your Embedded Information is set in the Survey Flow. You need to do this even if it is saved in the contact list.
If you only added this Embedded Data to your Survey Flow later uploading the survey to your app, brand sure to refresh the survey.
If you are collecting responses from Embedded Data loaded into a contact listing, information technology also helps to refresh the list. Get to Manage > View Contacts and click the list. So click Edit and Refresh All.
Qtip: In social club for contact lists to display in the Offline App, your account must accept the Access API permission enabled. Contact your Make Administrator if you demand the permission enabled.

Using Embedded Information Tracking
- In your offline app, navigate to the survey you downloaded.
- Click the crimson button with a gear icon to go to the Manage menu.
- Click Embedded Data Tracking.
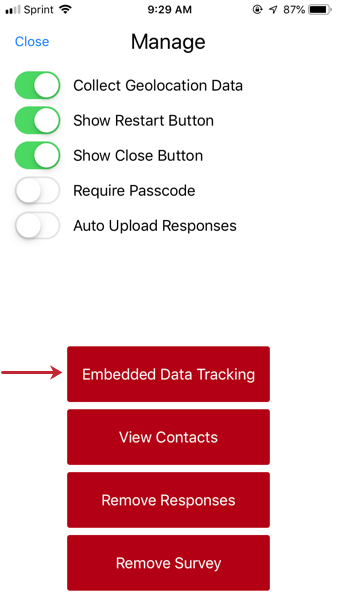
- In the Search bar, type the exact proper noun of the Embedded Data you desire to look at the results for. Capitalization and spelling matter.

- Below, you volition meet the values for this Embedded Information field and the number of responses that had this value. You can clickNameorCount to change the order in which the values are sorted.

Kiosk Fashion
Kiosk Mode is an option available but on Androids and Tablets. Using Kiosk Mode, you can hide the shut button from respondents and time how long they take to work on their response before the survey refreshes. This survey refresh part is great if you have devices set so that people can easily get out before finishing; you do not want someone else using the device on the same unfinished response.
To access Kiosk Fashion:
- Once a survey is downloaded, clickManage Survey.
- SelectKiosk Mode.
- Adjust the Survey Restart Timer. Leave it all the way to the left to avoid resetting and give the respondent equally much time as they need. Drag the slider and choose a time if you want to reset subsequently a certain point.
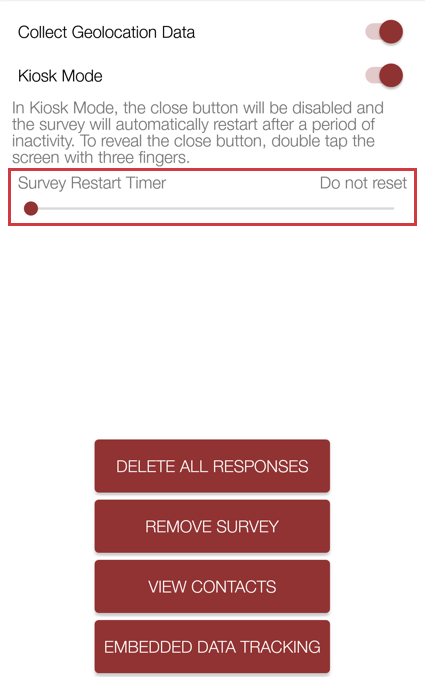
Qtip: You lot should set a reset time if y'all are worried people will start, but and then wander off without finishing. You don't want someone else going to the tablet and finishing someone else'south response, since this skews the results.
- ClickBack.
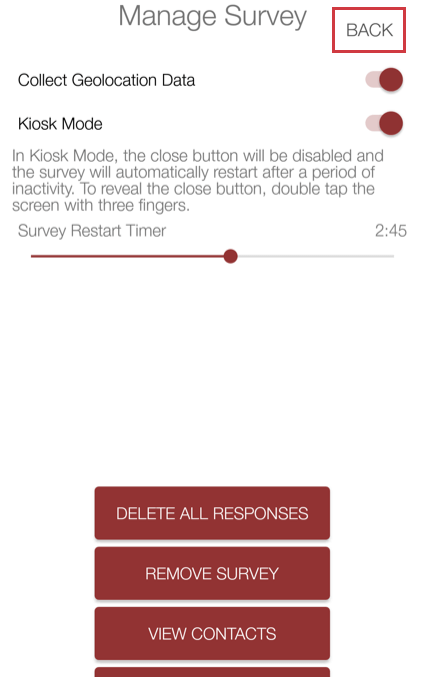
- Click to take the survey.
- The close push button will be gone in the upper-right.
Qtip: You tin use your back push, back swipe, or other device equivalent to get out the survey. If your device does not have these options, double tap the screen with three fingers to reveal the close button.
When you go to Manage and select View Contacts, you can click on contact list members to complete a survey for them. However, there are additional functions on this page that can improve the survey distribution feel.
Qtip: In guild for contact lists to display in the Offline App, your business relationship must take the Access API permission enabled. Contact your Brand Administrator if you lot demand the permission enabled.
Refreshing Your Contacts
Sometimes, if y'all make a modify to your contact lists on your desktop and then go back to the app without refreshing, you won't see the changes right away. You'll need to refresh your lists to run into your changes.
- Click the ruby button with a gear icon to go to the Manage menu.
- Select View Contacts.
- Click Edit.

- Click Refresh All.

Hiding Contact List Members
Sometimes, yous'll be working with a large contact list, and volition want sure members of that list to be put bated. Maybe in that location are respondents who are finished. Perchance at that place are members who have told y'all they don't want to participate, afterwards all. You tin hide listing members so that they are out of the manner.
- Click the red push with a gear icon to go to the Manage menu.
- Select View Contacts.
- Click on the desired contact list.
- Click Edit.

- Select the people you wish to hide.

Qtip: You can search for specific contacts by entering their name or email address in the search bar at the pinnacle of the list.
- Click Hide.
Coil to the bottom of your contact list to find the list of Hidden members. Click to expand.

If you no longer want to hide a fellow member, click Prove adjacent to their name.
Qtip: Y'all cannot complete a survey for a hidden list member. You must Show that fellow member in the contact list to enter their survey session.
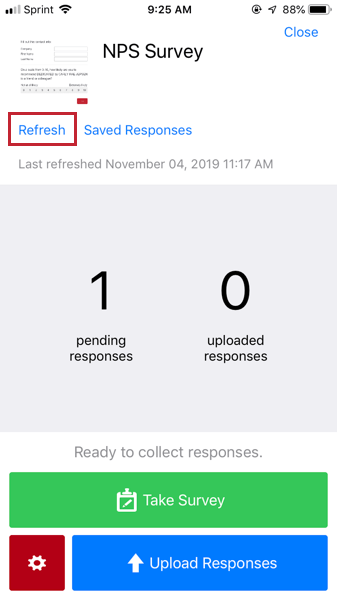
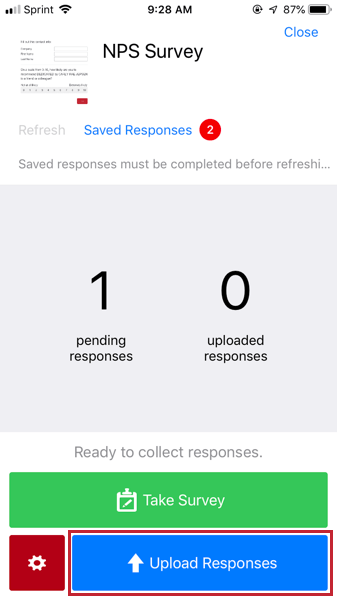
Uploading Responses
Once you've nerveless responses and accept an active internet connectedness, yous can upload the responses into your Qualtrics business relationship. Past default, uploads are always performed on a "per request" basis, meaning the app will not automatically upload responses on your behalf unless specified.
Later on tapping uploading, responses are removed from your mobile device and become available in the Responses and Results tabs of your Qualtrics account. Uploading also increments the Completed Responses number on the survey overview window.
Warning: Never log out of the Offline App if you have responses to upload. If you log out of the app without uploading your responses, you lot will lose your responses.
To upload pending responses and previews
- Navigate to the survey screen.
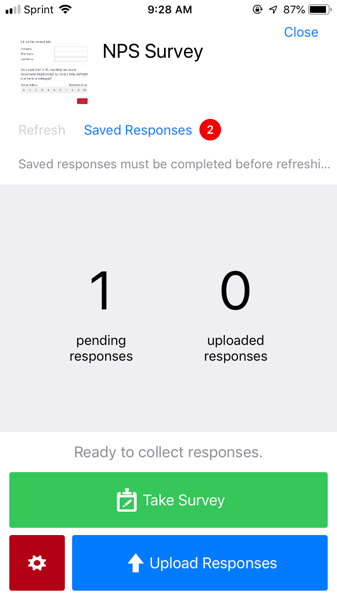
- Tap Upload Responses on the bottom right of the survey screen.
To upload incomplete responses
- Navigate to the survey screen.
- Tap Incomplete Responses on the survey screen.
- Tap Edit and then select the responses you desire to upload.
- Tap Activeness and choose Upload Responses.
To Auto Upload Responses
The Offline app allows you to enable auto uploading of responses. When this setting is enabled, your device will automatically upload your responses one time connected to the internet.
- Navigate to the survey screen.
- Click the crimson push button with a gear icon to go to the Manage carte.
- EnableAuto Upload Responses.
Troubleshooting
Occasionally, certain settings will restrict the app from uploading responses to your online account. In this instance, there are several things you tin can check:
- Brand sure you have the latest version of the app. Updating the app won't delete any responses as long as you don't log out.
- Find more than stable WiFi.
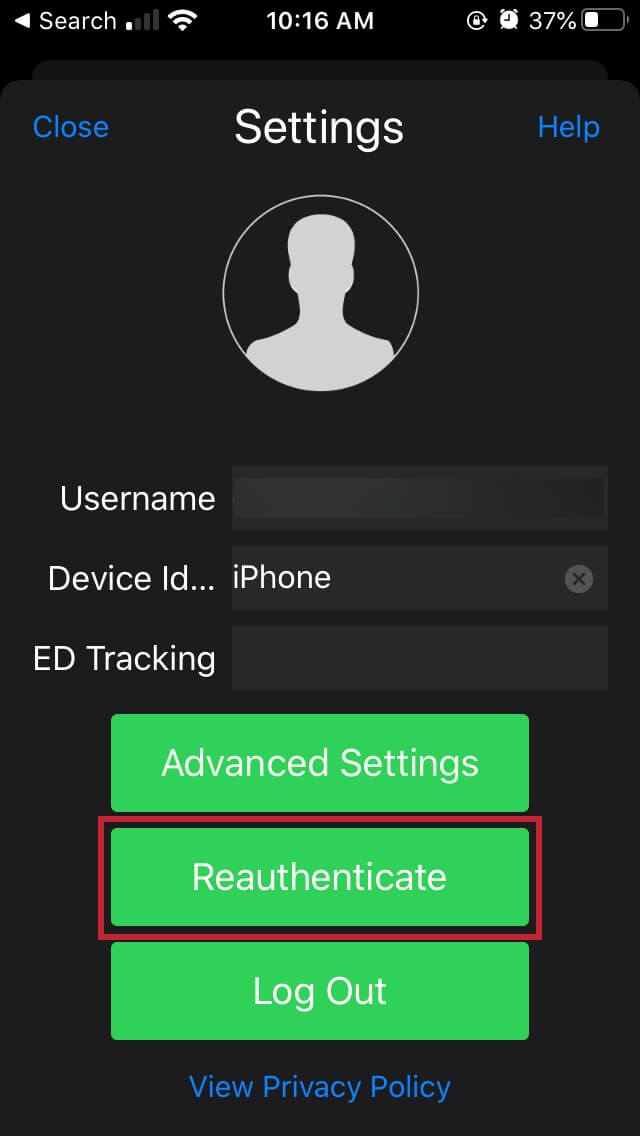
- Reauthenticate into the app by selecting "Settings" and "Reauthenticate." This will not cause whatsoever responses to be deleted.
- Log in to Qualtrics and make sure that "By Invitation Only" is not checked in the Survey Options. Besides, if Quotas be, make sure they are non filled.
- Brand sure the survey is active. The survey condition cannot be inactive/closed.
- If working with a collaborated survey, be certain the survey is still collaborated with the account logged into the app.
FAQs
Related Articles
Source: https://www.qualtrics.com/support/survey-platform/distributions-module/mobile-distributions/offline-app/collecting-and-uploading/
0 Response to "Responses Finished in Qualtrics Are Not Updating Uploading"
Post a Comment